This post may contain affiliate links: full affiliate disclosure.
A plain sweatshirt is one of the easiest pieces of clothing to turn into something that feels completely different.
You do not need to sew an entire garment from scratch either. A few fabric scraps can become a heart, lettering, a quilt block, a bold back panel, or a small appliqué that changes the whole look of a sweatshirt you already own.
The tricky part is that sweatshirt fabric does not behave like quilting cotton. It stretches, it can shift while you sew, and thicker fleece can make stitching bulky.
That does not make patchwork sweatshirts difficult. It just means the preparation matters. Once you understand how to stabilize the sweatshirt and build the patchwork separately where possible, the project becomes much easier.
Before You Start a Patchwork Sweatshirt
Wash and dry the sweatshirt before adding fabric. That is especially important if you are combining a new sweatshirt with cotton scraps that may shrink differently after the first wash.
For most beginners, making the patchwork piece first and attaching it afterward is the easiest method. It keeps the stretchy sweatshirt out of the sewing machine while you are piecing small scraps together.
If this is your first clothing upcycle, our Easy DIY Clothes Ideas article has more projects that start with clothes you already own.
What Stabilizer Should You Use on a Sweatshirt?
A cut-away stabilizer is usually the safest choice when you are embroidering or doing dense decorative stitching on a sweatshirt.
Want to try this idea? A cut-away embroidery stabilizer stays behind the stitches and helps stretchy sweatshirt fabric keep its shape. See cut-away stabilizer on Amazon →
Sweatshirt fabric stretches, but the stitching does not stretch in the same way. Without support, the fabric can pull around the design and leave the finished area looking rippled or wavy.
A cut-away stabilizer stays behind the stitches after you finish sewing, so the design continues to have support when the sweatshirt is worn and washed.
For a normal mid-weight sweatshirt, one layer is often enough. A dense embroidery design, large appliqué, or very stretchy sweatshirt may need stronger support, but too much stabilizer can make the sweatshirt stiff.
Cut-Away vs Tear-Away Stabilizer
Tear-away stabilizer is useful for fabrics that are already fairly stable. Sweatshirt fabric usually is not. Once tear-away stabilizer is removed, the stitches no longer have much support underneath them.
If the sweatshirt stretches noticeably when you pull it gently from side to side, cut-away is the safer option.
Should You Use Fusible Web Too?
Fusible web and stabilizer do different jobs. The stabilizer supports the sweatshirt while you stitch, while fusible web holds the appliqué fabric in position.
For patchwork letters, hearts, stars, and other layered shapes, fusible web can make the sewing much easier because the pieces stop sliding while you stitch around them.
Save this article for later! 👇👇
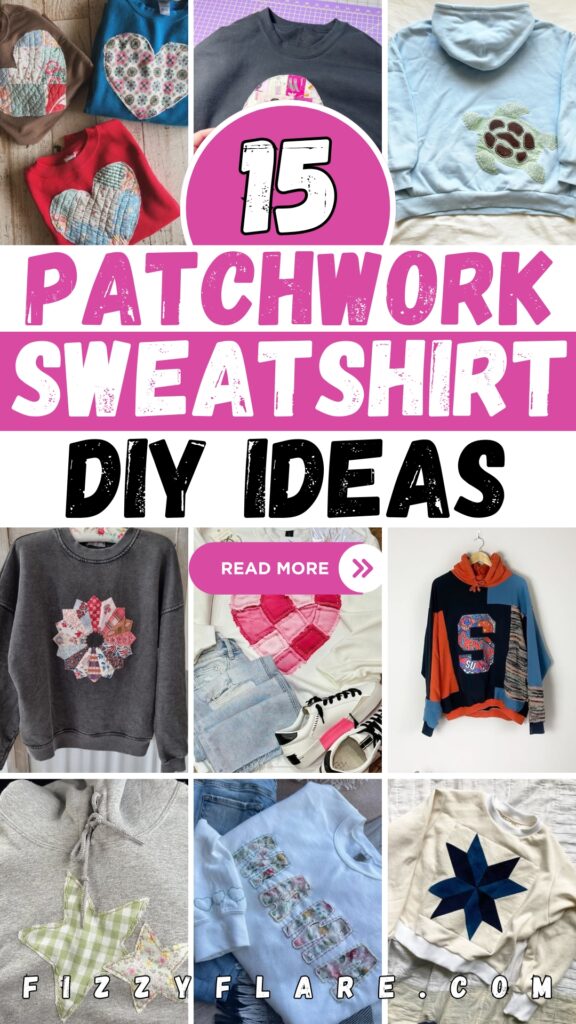
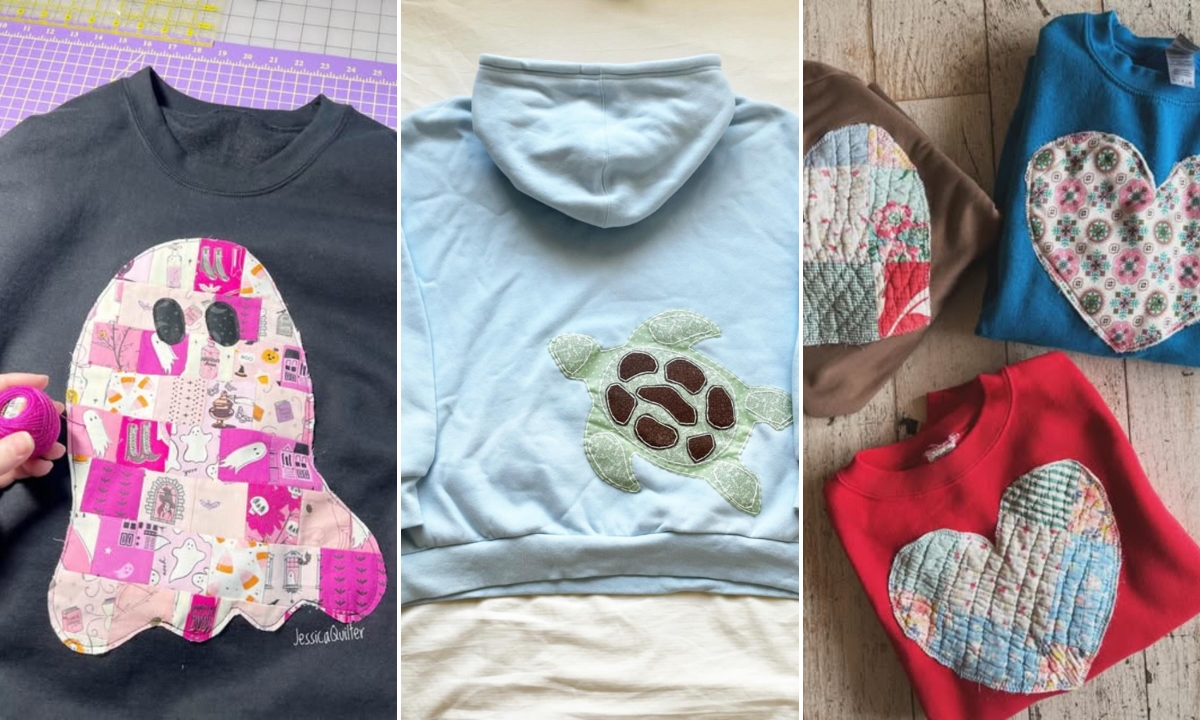
Appliqué Back Motif
A large appliqué across the back is one of the easiest ways to make a plain sweatshirt feel intentional rather than simply patched.
Want to try this idea? Fusible web makes layered appliqué much easier because it holds the fabric pieces in position before you stitch around the edges. See fusible web on Amazon →
Start by creating the design on paper. A simple flower, animal, bow, fruit shape, number, or graphic silhouette works well because you can divide the shape into several fabric sections without making the outline difficult to recognize.
Piece or arrange the scraps first, then use fusible web to hold the motif in place before sewing. A narrow zigzag stitch gives the edges more coverage, while a straight stitch creates a more relaxed raw-edge finish.
For a large back design, place cut-away stabilizer behind the sweatshirt while stitching so the fabric does not stretch and shift under the presser foot.
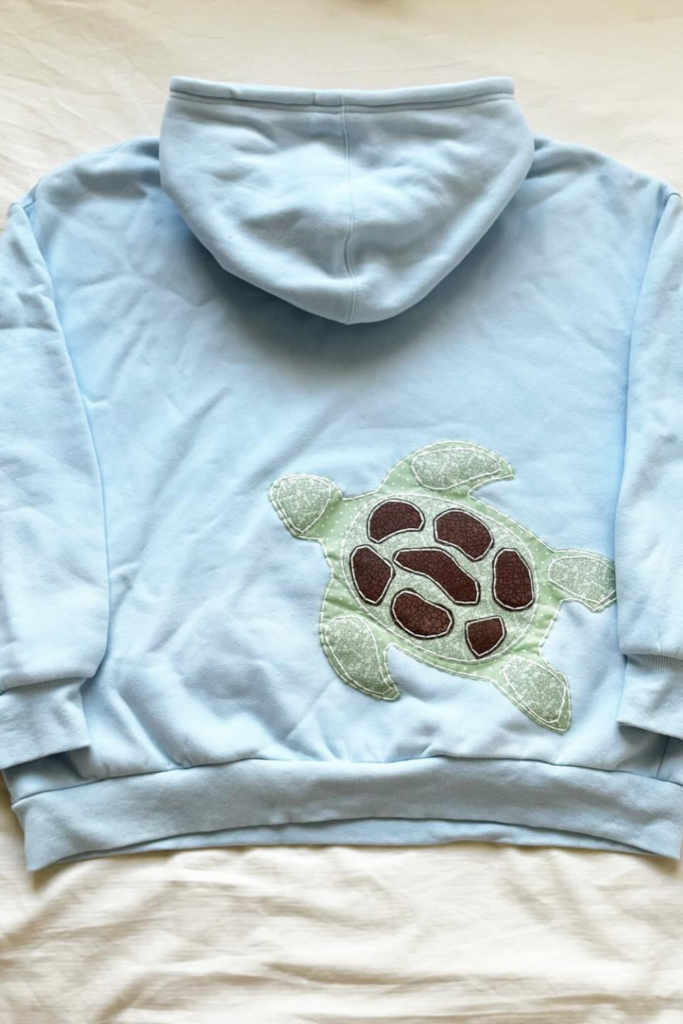
Patchwork Character Panel
A character or graphic shape gives you more room to play with fabric without piecing directly on the sweatshirt.
Sew several scraps together into a patchwork panel first. Then place your character template over the finished panel and cut the entire silhouette at once.
That keeps the outline clean even though the fabric inside it is busy. Fuse the character to the sweatshirt before sewing, then add any small details after the main shape is secure.
This same method works for flowers, animals, initials, numbers, and other simple graphic shapes.
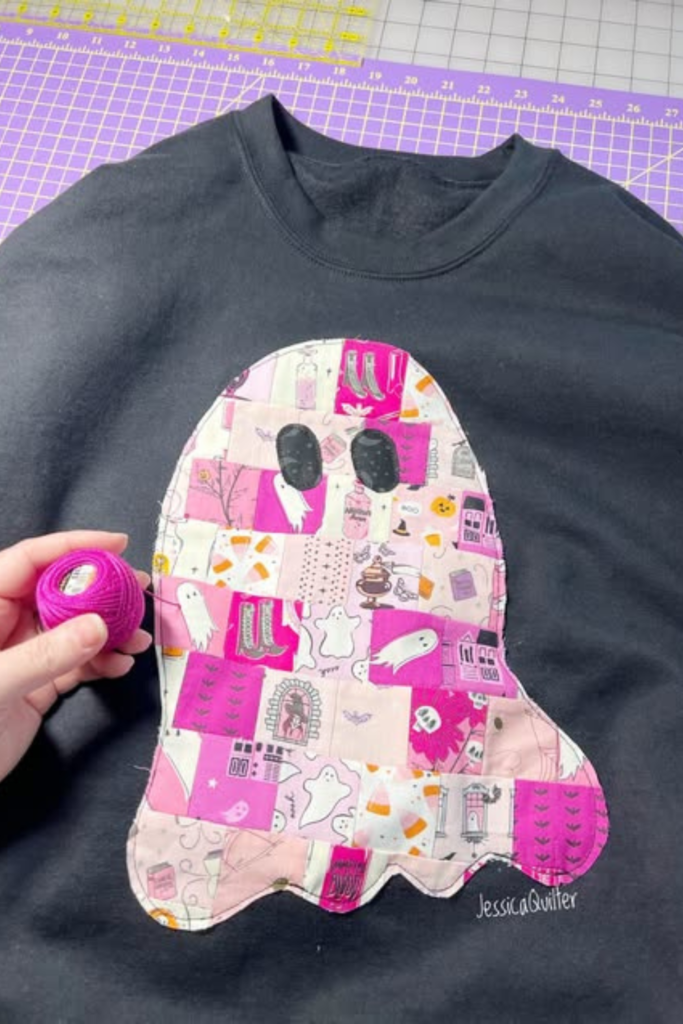
Quilted Heart Patch
A quilted heart is a lovely project if you have very small fabric scraps that are too nice to throw away.
Piece the scraps into a square or rectangle first, then add a thin layer of batting behind the patchwork and quilt through both layers.
Want to try this idea? Thin batting adds a little dimension without making the sweatshirt feel overly bulky. See thin quilt batting on Amazon →
Once the mini quilt is finished, cut the heart shape and attach it to the sweatshirt with stitching around the edge. Making the heart after quilting is much easier than trying to piece lots of tiny scraps directly into the final shape.
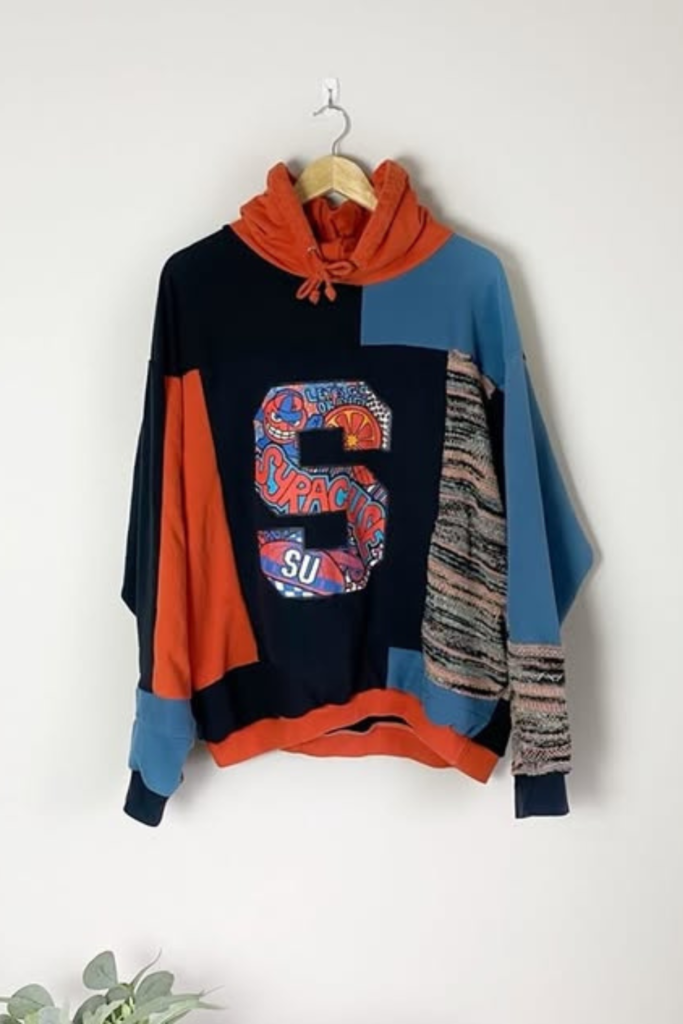
Colorblock Statement Hoodie
This idea suits someone who is comfortable doing a little more sewing because the colorblocking becomes part of the garment rather than one small patch.
Sleeves, pockets, hoods, and front panels are all good places to introduce contrasting sweatshirt fabrics or knit pieces.
If you are modifying a ready-made hoodie, it can be easier to appliqué a larger fabric panel onto the existing garment than to take the hoodie apart and reconstruct it.
Keep the palette fairly limited. Three or four fabrics that work together usually look stronger than trying to use every scrap at once.
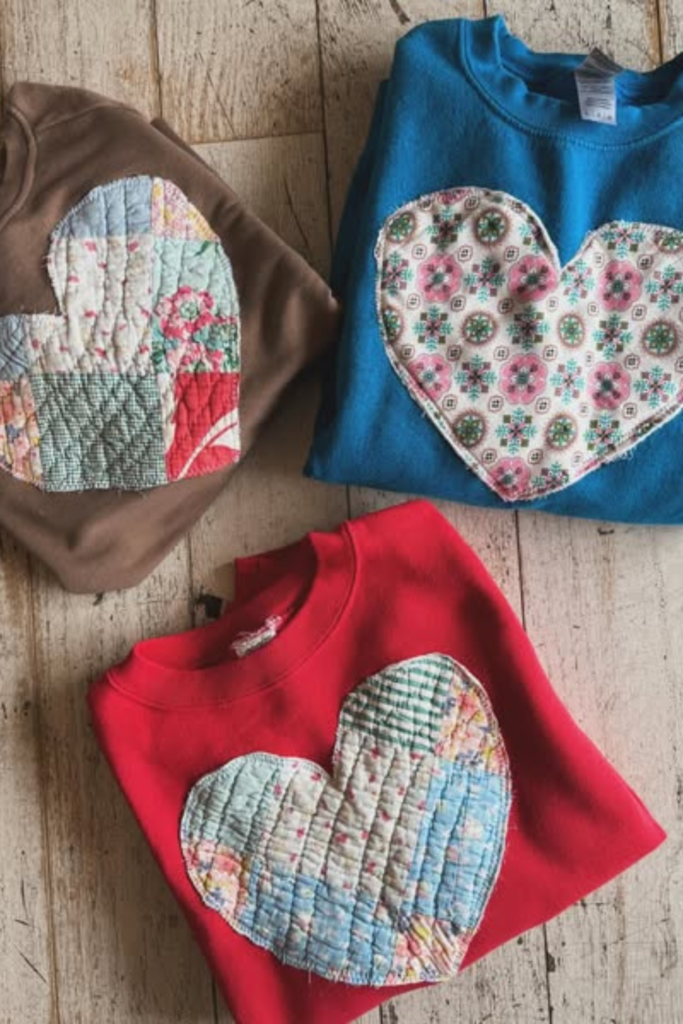
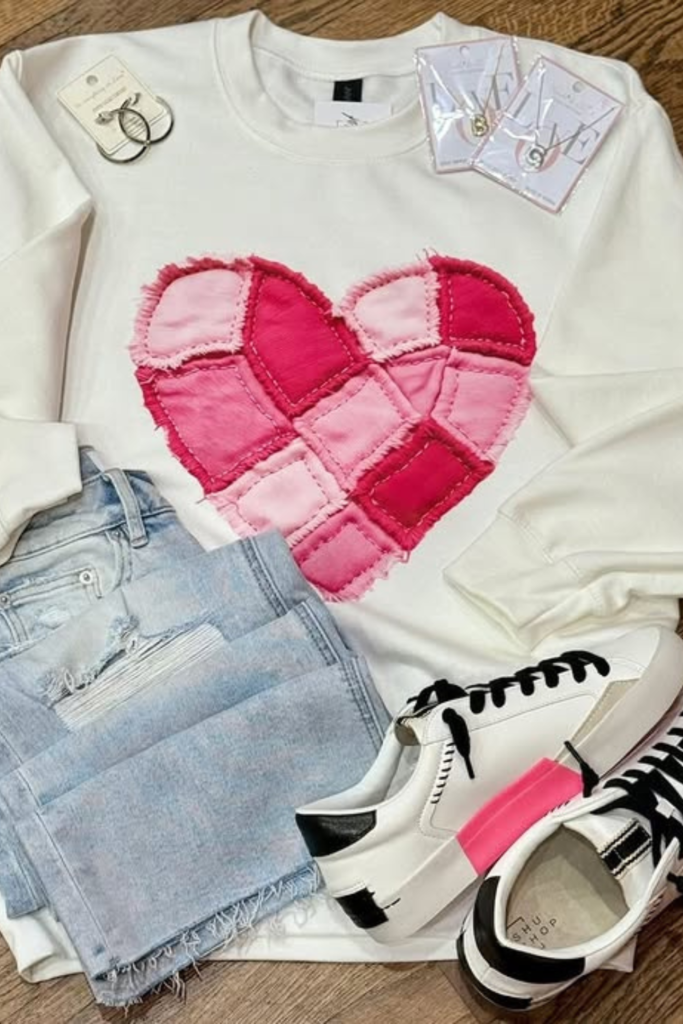
Raw-Edge Heart
If you like a softer, slightly worn-in patchwork look, leave the fabric edges unfinished.
Piece several scraps together, cut the finished panel into a heart, then sew it directly onto the sweatshirt with a line of stitching slightly inside the raw edge.
After washing, the edge will soften and fray a little. That is part of the look. Cotton fabrics usually work well because the edges soften nicely without becoming too bulky.
If the fabric frays aggressively, add a second line of stitching inside the first so the patch remains secure.
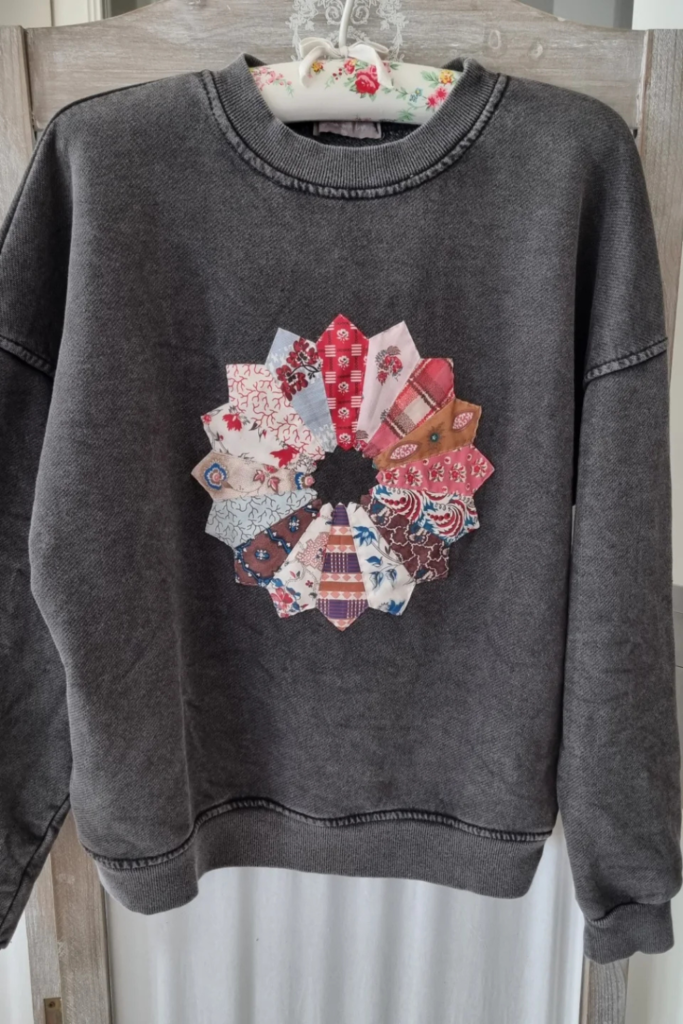
Wreath Patch Layout
A circular patchwork design works nicely on the centre of a sweatshirt because it creates one clear focal point.
Cut repeated wedges, leaves, petals, or small geometric pieces and arrange them around an empty centre before attaching anything.
Once the spacing looks balanced, fuse the pieces lightly in place and stitch around each section. Using fabrics with similar weight helps the circle stay flat.
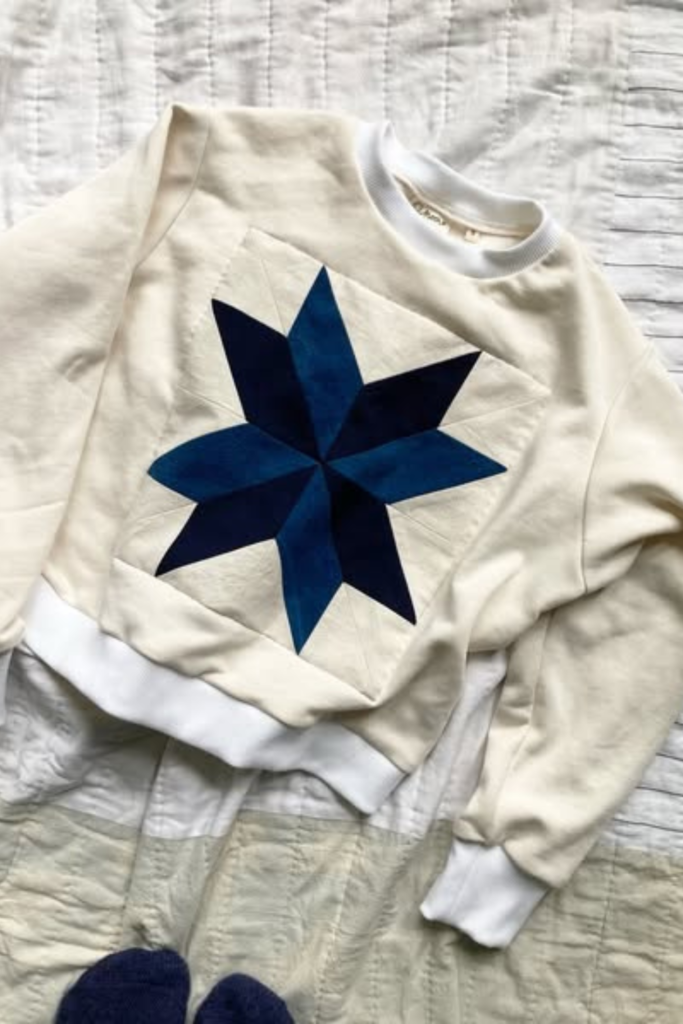
Geometric Quilt Star
A quilt star can look surprisingly polished on a simple crewneck sweatshirt.
Piece the star separately as if you were making a small quilt block, pressing the seams as you go so the angles stay crisp.
Once the block is complete, trim it into a clean square, circle, or the outline of the star itself, then attach the finished unit to the sweatshirt.
If you are new to quilting, choose a simple star with larger pieces rather than one made from lots of tiny triangles.
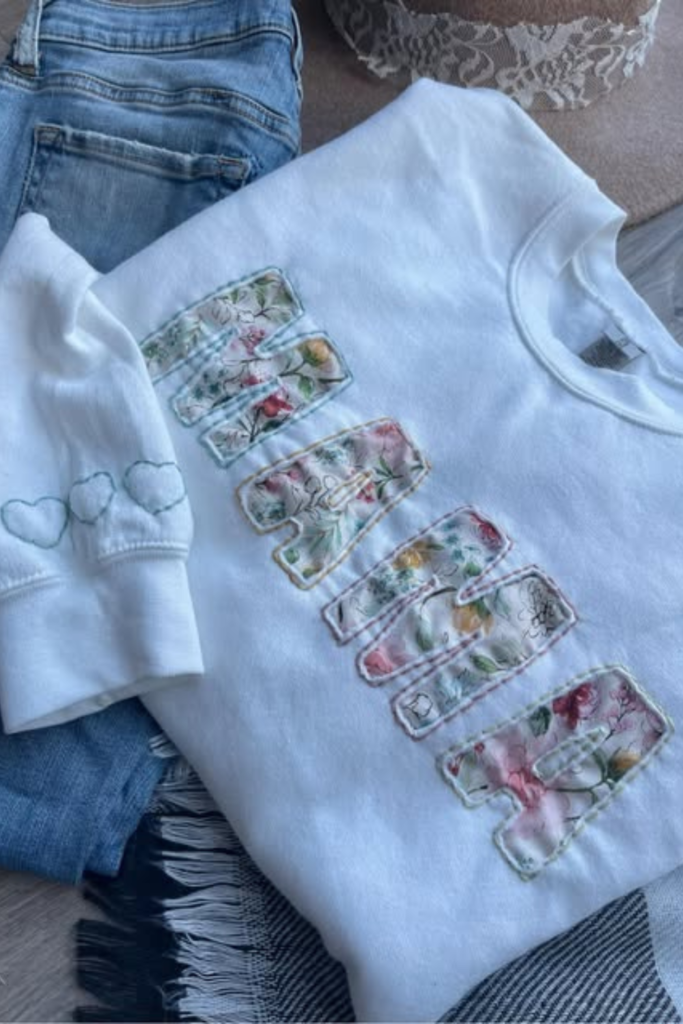
Patchwork Name Letters
Patchwork lettering is one of the easiest ways to personalize a sweatshirt.
Sew scraps together into one or more small panels, then trace and cut large block letters from the finished patchwork. Block fonts are much easier to stitch than narrow script lettering.
Want to try this idea? A sharp pair of fabric scissors makes clean letters and small patchwork shapes much easier to cut accurately. See fabric scissors on Amazon →
Arrange all the letters on the sweatshirt before attaching the first one so you can check the spacing from a distance.
Fuse each letter in place and stitch around the edges for a clean, durable finish.
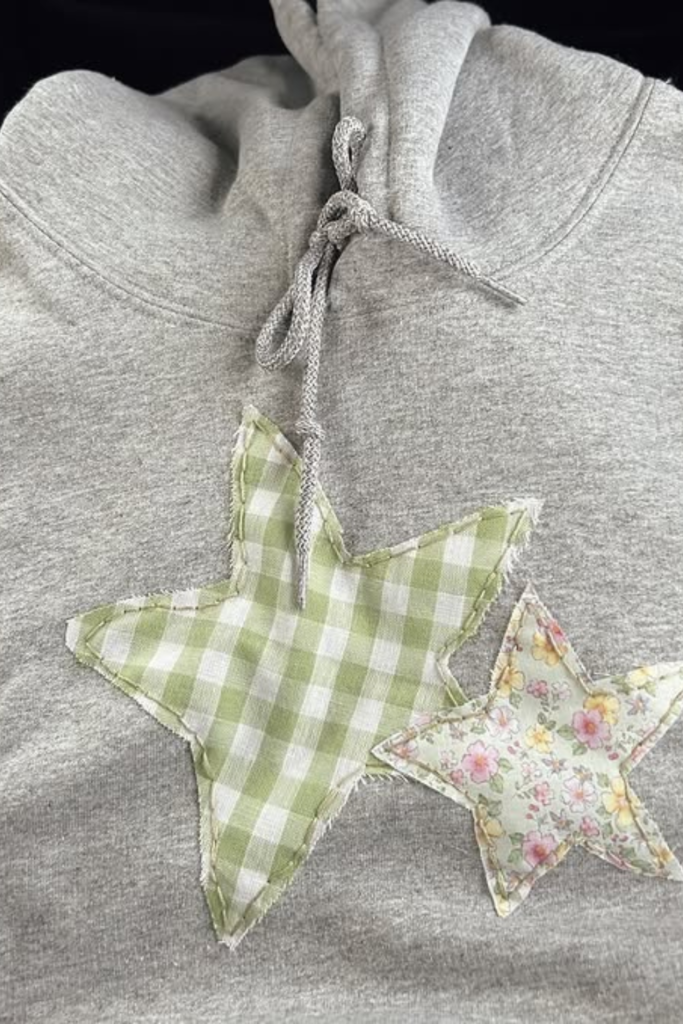
Layered Star Patches
Small stars are a good choice if you want patchwork without covering the whole sweatshirt.
Make several stars in different sizes and place them near the shoulder, neckline, sleeve, or upper chest. You can use a different fabric for each star or stack two stars together for extra dimension.
Before sewing, pin or temporarily fuse all of the stars in position and look at the group as a whole. Leaving some empty space usually makes the arrangement look more intentional.
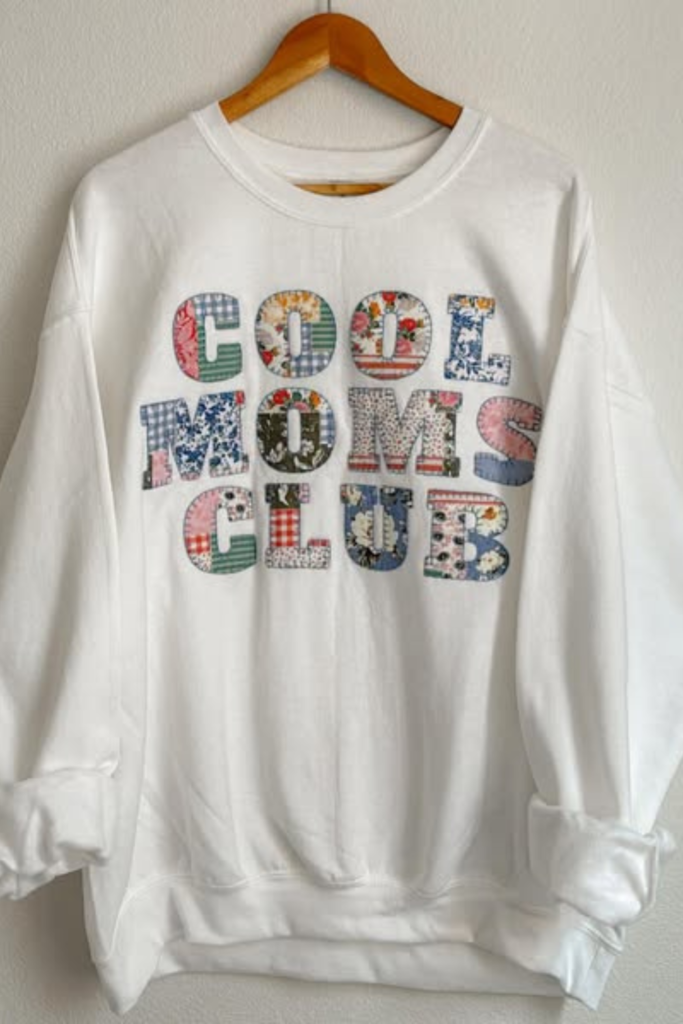
Phrase Patch Letters
This uses the same basic technique as name lettering, but the design becomes more graphic when the letters form a short phrase.
Keep the wording short. Two or three words usually work better than a long sentence because larger letters are easier to cut and stitch.
You can use a different print for each letter or repeat several fabrics throughout the phrase so the colours feel connected.
Before attaching anything, use a ruler or removable tape as a temporary baseline so the wording stays straight across the sweatshirt.
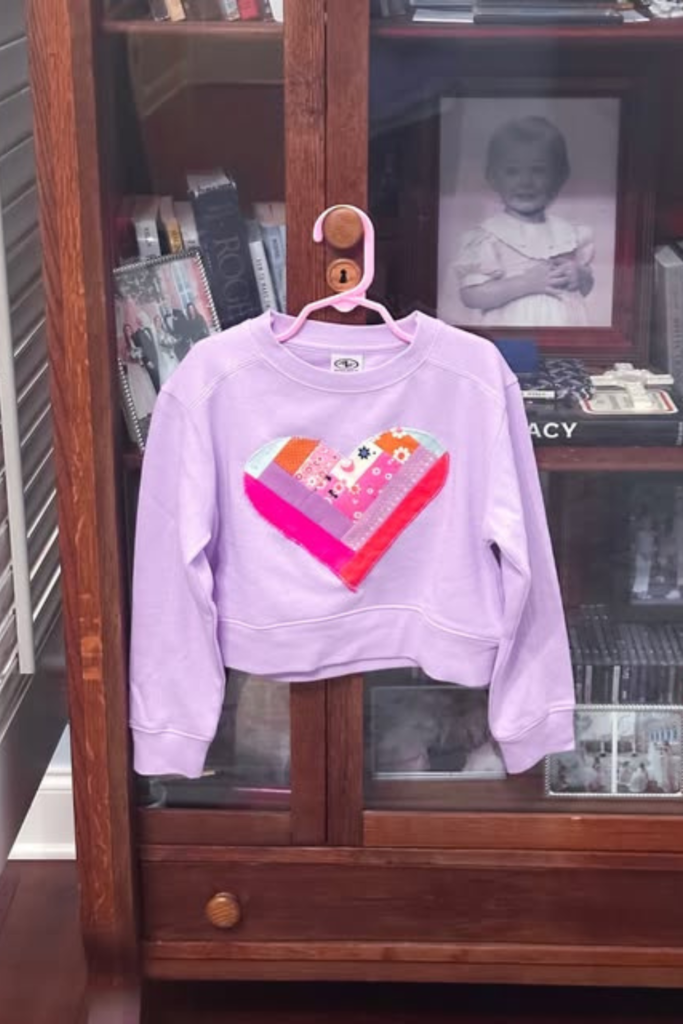
Scrappy Heart Block
A small heart made from narrow strips is a nice way to use leftover fabric from other projects.
Sew the scraps into a small rectangular block, press the seams, then cut the heart from the completed block.
Because the heart is small, it works well on the chest, a sleeve, a cropped sweatshirt, or a child’s sweatshirt. You can use raw-edge stitching for a casual finish or turn the edge under slightly for something neater.
If your patchwork contains lots of seams, avoid making the heart too tiny because several seam allowances meeting in one place can become bulky.
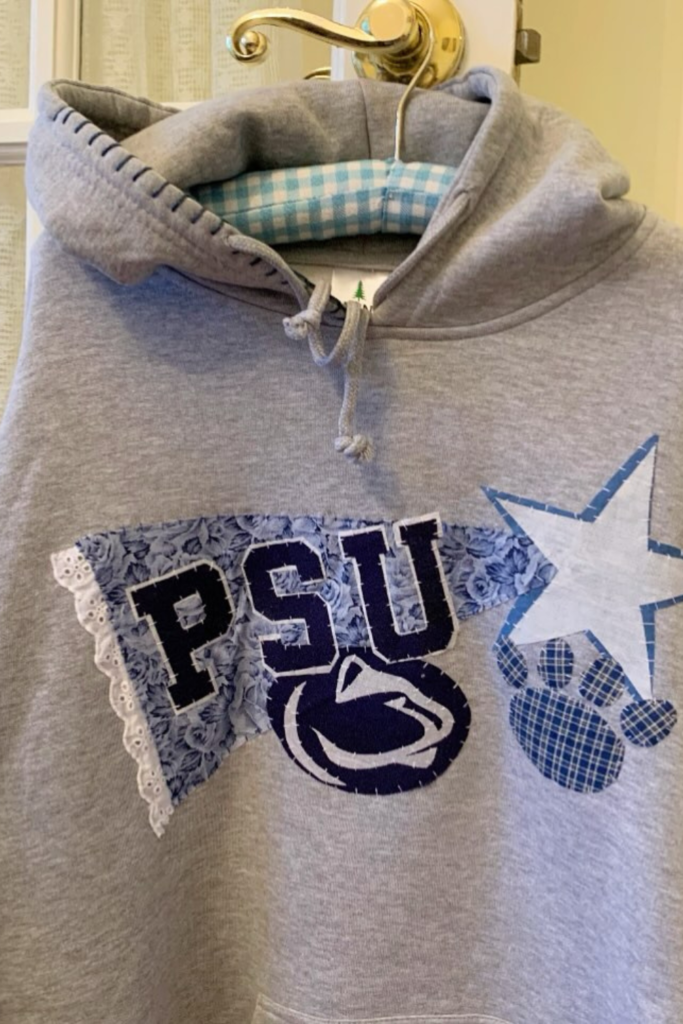
Mixed Logo Patch
If you are working with an existing graphic sweatshirt, patchwork can be used around the graphic rather than covering it.
Add scrap fabric behind part of the logo, frame it with patchwork shapes, or create a larger background panel. The important thing is keeping the original image readable.
If the logo is already detailed, use calmer fabrics around it. If the existing design is very simple, brighter patchwork can work well.
This can also be a useful way to repair a stained or damaged area around a graphic. If you need to sew through printed material, test a hidden area first because some finishes are thicker than normal sweatshirt fabric.
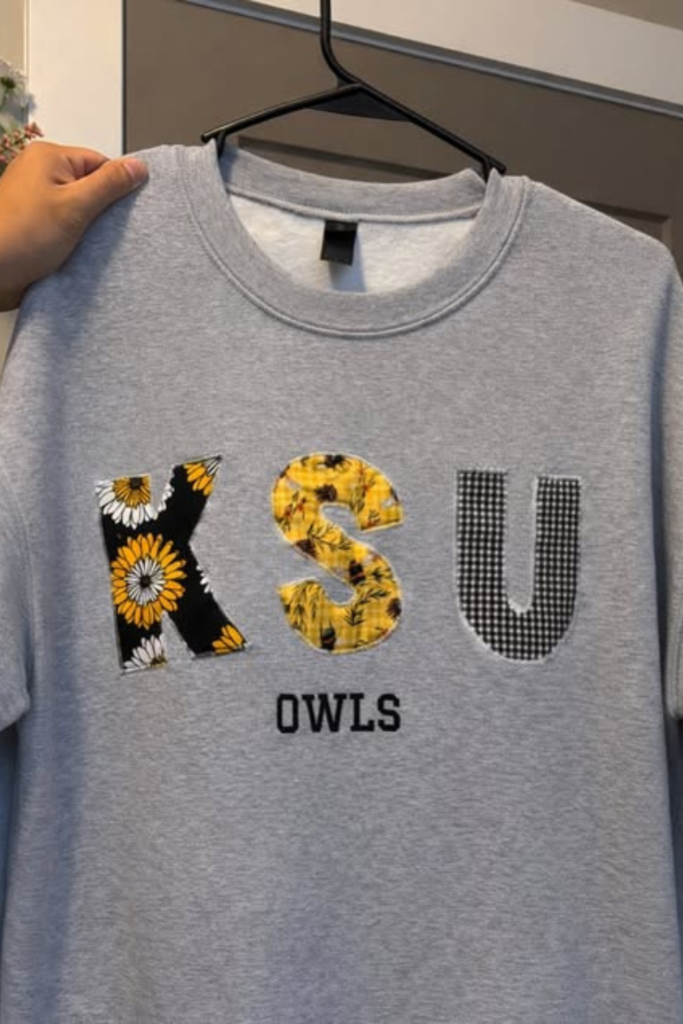
Mixed Fabric Letters
Instead of building every letter from a patchwork panel, cut each letter from a different fabric.
This gives you the mixed-fabric look with much less piecing. Choose fabrics that contrast clearly with the sweatshirt so the word remains easy to read.
Lay the entire word out before sewing. If one print feels too dominant, move it to another letter or repeat it elsewhere so the design feels balanced.
Fusible web is especially useful here because individual letters can shift easily. A straight stitch creates a relaxed finish, while a narrow zigzag gives the edges more coverage.
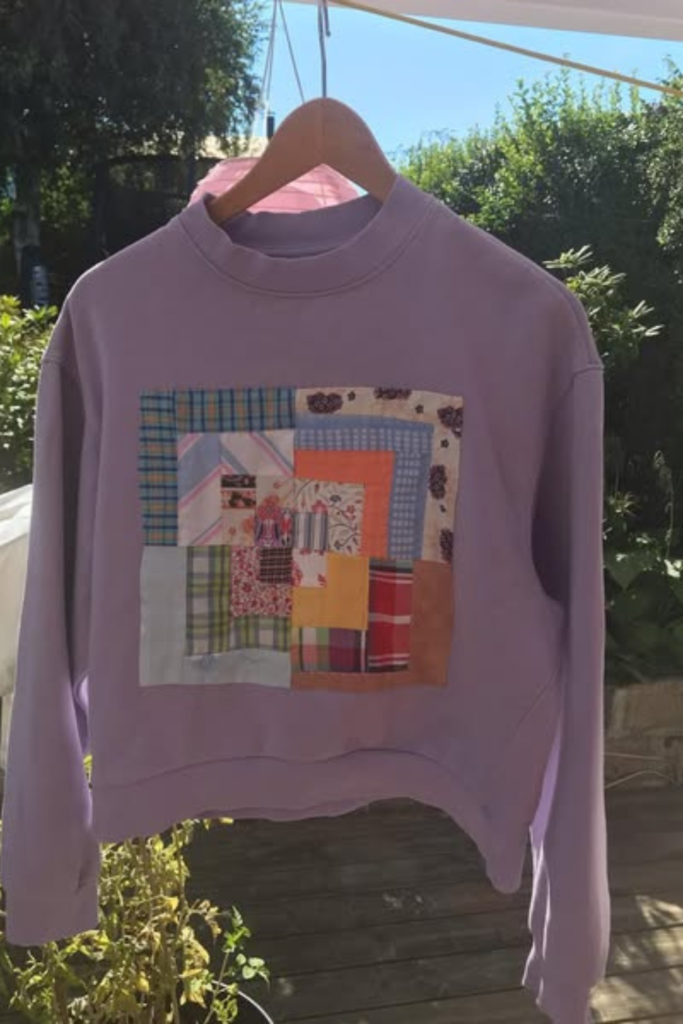
Center Patch Panel
A square or rectangular patchwork panel is one of the easiest statement designs to make.
Create the patch completely away from the sweatshirt first. You can use simple squares, strips, log-cabin style frames, or irregular scraps.
Once the panel is finished, press it flat and decide whether to keep the straight edges or trim it into another shape. Boxy and oversized sweatshirts usually give a centre panel enough room without feeling cramped.
If you have a larger collection of scraps, our Fabric Storage Ideas can help keep the leftovers useful instead of disappearing into one large bag.
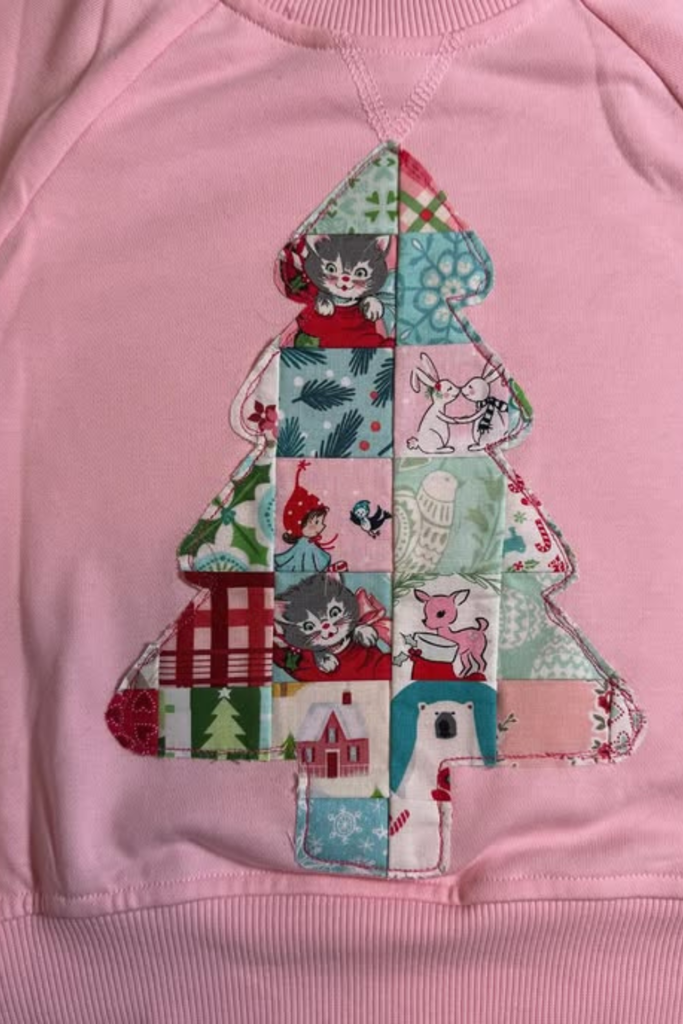
Patchwork Tree Shape
A tree is a good example of how the same patchwork technique can become seasonal without changing the basic process.
Sew several scraps into one panel first, then cut the tree shape from the finished patchwork. For a simple version, use a large triangle with a trunk; for more detail, build several stacked sections.
Attach the entire tree as one appliqué rather than sewing every fabric square directly to the sweatshirt. That keeps the edges much easier to control.
The same technique also works for pumpkins, flowers, houses, bows, mushrooms, or simple animal silhouettes.
How to Keep Patchwork Flat on a Sweatshirt
Most distortion happens because the sweatshirt stretches while you sew. Try not to pull the garment through the machine; let the feed dogs move the fabric naturally.
A stabilizer underneath helps considerably, especially around larger appliqués and dense stitching. Fusible web can also stop the patch itself from shifting.
If the sweatshirt begins looking wavy while you sew, stop and check what is happening rather than continuing around the whole design. The problem is much easier to fix before the entire appliqué is stitched down.
What Fabric Works Best for Sweatshirt Patchwork?
Quilting cotton is one of the easiest fabrics to use. It is stable, easy to cut into clean shapes, and available in endless prints. Old cotton shirts can also make useful scraps.
Light denim can work for a tougher patch, although it adds more bulk. Very stretchy knit fabrics are possible, but they are harder for a first appliqué because both the patch and sweatshirt can move while you sew.
Try to keep the fabric weights reasonably similar within one design. If you want more beginner sewing projects first, our Easy Sewing DIY Ideas are a gentler place to practise.
How Should You Finish the Edges?
A straight stitch near the edge gives a casual handmade finish and allows a little fraying. A zigzag stitch catches more of the edge and gives better protection from fraying.
A tight satin stitch creates a more traditional appliqué finish, but it also adds more thread and stiffness. For intentionally raw-edge patchwork, stitch just inside the edge and let the fabric soften naturally through washing.
If you are unsure, make a small test patch first. It is much easier to decide you dislike a stitch on scrap fabric than halfway around a large back appliqué.
How to Wash a Patchwork Sweatshirt
Turn the sweatshirt inside out before washing so the appliqué stitching rubs less against other clothes.
Use a normal cool or warm wash that suits both the sweatshirt and the added fabrics. Avoid very high dryer heat if you are unsure how the patch fabrics will react.
Check the appliqué after washing. If you notice a small area lifting, repair it early with a few stitches rather than waiting for the edge to loosen further.
FAQs
Can I embroider a sweatshirt without stabilizer?
You can technically stitch small designs without stabilizer, but it is much easier for the sweatshirt to stretch and distort.
For embroidery or dense decorative stitching, cut-away stabilizer is the safer choice because it stays behind the stitches and continues supporting the fabric after the project is finished.
Should I hoop the sweatshirt or float it?
Both methods can work. A relatively thin, stable sweatshirt can sometimes be hooped with the stabilizer, but do not stretch the sweatshirt while hooping it.
Thicker sweatshirts are often easier to float. Hoop the stabilizer first, place the sweatshirt on top, then secure it with temporary adhesive or basting stitches.
Do I Need Fusible Web for Patchwork Appliqué?
No, but it makes many projects easier because it temporarily bonds the fabric pieces to the sweatshirt so they do not move while you stitch.
If you prefer not to use fusible web, pin or baste the patch instead. Just make sure the fabric is secure before sewing.
Can I Make a Patchwork Sweatshirt Without an Embroidery Machine?
Yes. Almost every idea in this article can be made with a normal sewing machine using straight stitch, zigzag stitch, or a decorative stitch around the appliqué.
You can also sew simple patches by hand, although larger designs will take longer. An embroidery machine is useful for detailed outlines, but it is not required for the basic patchwork techniques.
Start With One Small Patch
If you have never made a patchwork sweatshirt before, you do not need to begin with a full back design. Start with one small heart, star, letter, or chest patch.
You will learn how the sweatshirt moves under the machine, how much stabilizer you like, and which edge finish feels easiest. Once you are comfortable with that, larger patchwork panels become much less intimidating.
For a larger hoodie project after this, take a look at our DIY Patchwork Hoodie guide.

Hi, I’m Jenny, the founder of Fizzy Flare, and together with my team, we create practical content to help make everyday life a little easier. I’ve been blogging since 2021 and have worked on several websites over the years. Today, our focus is Fizzy Flare, where we share helpful ideas for organization, DIY projects, printables, self-care, and simple everyday living.