How to Make a DIY Pin Board – Ultimate Guide

This post may contain affiliate links: full affiliate disclosure.
You decide to make a pin board, grab some cork and fabric, and put it together.
At first, it looks fine, but within a few days, the pins do not stay in place, the fabric starts to sag, or worse, the whole thing falls off the wall.
Does this sound familiar? This is the problem with most do-it-yourself tutorials – they leave out the small details that make the difference between a weak project and a board you can actually use every day.
In this article, I will show you how to build a pin board the right way.
I will cover the right thickness of cork, adhesives that will not fail, and hanging methods that keep it secure.
Let’s jump into it!
Save this article for later! 👇👇

Contents
Which Adhesives Should You Use?
The glue you pick determines how long your pin board will survive.
Many boards fail because people choose the wrong adhesive, which makes the cork peel away or melts the foam underneath.
When you glue cork to wood, MDF, or Homasote, use PVA wood glue or contact cement. You should spread the glue evenly with a brush or roller.
For better results, place something heavy on top while it dries.
This keeps the surface flat and prevents air bubbles from forming.
When you work with foam boards, never use regular spray glue like 3M Super 77 because it will melt the foam.
Choose a foam-safe adhesive like 3M Foam Fast 74 instead, or apply hot glue around the edges.
Materials That Actually Work
- ¼” MDF board (video board size: 24″ × 48″; she makes two)
- Foam insulation panels (same footprint as the MDF)
- Sturdy fabric (she uses muslin; any medium/heavy fabric works)
- Hot glue gun (spray adhesive also works)
- Stapler with ¼” crown staples (corded/automatic or manual)
- Screws (2½”) + flat washers (for mounting)
Step-by-step method to Make a DIY Pin Board
Following are a few step by step methods to make a DIY pin board.
1) Glue foam to the MDF
First, lay the MDF on a flat surface. Apply small lines or dots of hot glue onto the MDF, and then place the foam panel on top of it.
Make sure the edges are lined up perfectly, and then press down firmly. You only need the foam to hold in place long enough for you to wrap it.
You can also use a spray adhesive for this step.

2) Prep the fabric
Lay your fabric face-down and smooth out any wrinkles. Put the board on top with the MDF side facing up so the foam side touches the fabric.

3) Start stapling the long sides
Pull the fabric tight and place your first staples in the middle of one long edge.
Keep pulling the fabric and work your way out toward the corners. Do the same thing on the other long side.
Use quarter-inch staples so they grab into the MDF without punching straight through.

4) Wrap the short ends like a gift
Before you staple all the way to the corners, fold the short ends just like you would wrap a gift.
Tuck in the extra fabric, make sure it is flat, and then staple it down. You should aim for a clean fold with minimal bulk so the board will hang flat against the wall.

5) Finish the perimeter
Go around the complete edge and finish stapling, keeping the fabric stretched evenly as you work.
Turn it over to check that the front appears smooth and wrinkle-free.

6) Mark mounting points
On the back of the fabric, make a mark one inch from each corner. These marks will show you where to attach the board to the wall.

7) Mount with screws + washers
Hold the board against the wall and drive a 2½” screw through a flat washer at each corner you marked.
Push the screw straight through the board and into the wall. Since this is a lightweight build, you can skip anchors and studs.
Do not over-tighten the screw – stop when the washer sits snug against the fabric so the screw head does not sink into the foam.

8) Style and use
Pin up your samples, photos, and notes. Use it as a design mood board or a household bulletin board.
Change your pins anytime as your ideas evolve.

How to Hang Your Pin Board Securely?
Hanging is where most people make mistakes. You create a nice board, attach it to the wall with weak strips, and within a week, it falls down along with all your notes.
The key is to choose the right hanging method for the weight of your board. For small, lightweight boards, Command strips work well.
Just remember, each set holds about four pounds, and the wall must be smooth.
If you are making a medium-sized board with a wood or MDF back, use D-rings or picture wire screwed into the frame.
This spreads the weight and keeps the board steady. For large or heavy boards, especially those with thick cork or plywood backing, a French cleat is the best option.
It is a simple two-piece bracket that locks onto the wall, holds a lot of weight, and keeps the board perfectly straight.
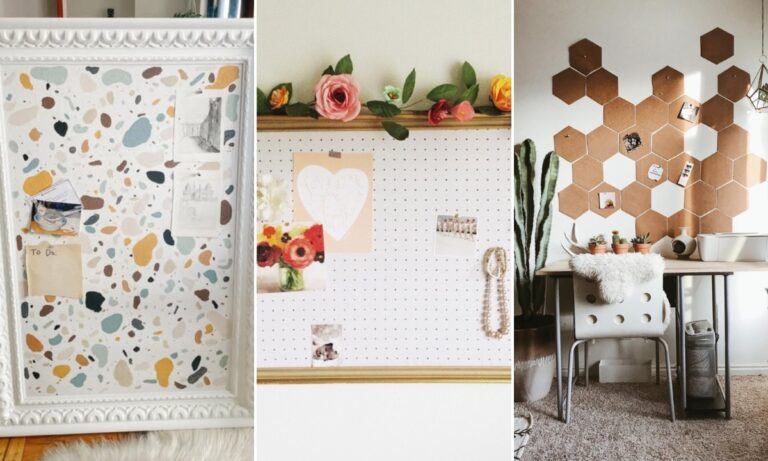
Different DIY Pin Board Styles You Can Try
You do not have to stick to just one kind of pin board. If you need something large but easy to move, an oversized foam-core board covered with cork and fabric is a great choice.
Renters can try pinnable felt tiles that stick to the wall and peel off without leaving marks.
For something that lasts longer, cork-linoleum boards are self-healing and stay smooth over time.
If you want more options, create a magnetic combo board by placing a steel sheet under the fabric.
Common Mistakes to Avoid
Most boards fail because people make a few simple mistakes. Thin cork cannot hold pins, so use at least a quarter-inch thickness.
The wrong glue can melt foam or loosen fabric – stick to wood glue or adhesives that are safe for foam.
Large boards need a backing board to prevent warping, and you must stretch the fabric tight to avoid wrinkles.
Finally, do not hang a heavy board with weak strips – use hardware that can handle its weight.
Conclusion
Making a DIY pin board is easy, but small mistakes can weaken it.
Pick the right materials, use glue that is safe and strong, pull the fabric tight, and hang the board in a way that supports its weight.
If you take the time to do it right, you will end up with a board that looks tidy, holds pins securely, and stays on the wall for years.
FAQs
Why don’t my pins stay on the board?
Your cork is too thin. Choose one that is at least ¼ inch thick, or add a backing board to make it hold better.
Can I make a pin board without cork?
You can use felt tiles or foam board, but they wear out faster. Cork or cork-linoleum lasts longer and grips pins better.
You may also like to read!
- How to Make a DIY Backpack – Step By Step Guide
- 6 Budget Bathroom DIYs Homeowners Can’t Stop Recommending
- The Best DIY Kitchen Makeover on Budget Straight From Real Homes

Fasial is the founder of the Fizzy Flare. He has been a passionate blogger since 2021. He ran three different websites in the past few years. Now he is focusing on Fizzy Flare to build an audience and help them organize their life.