8 Easy Bathroom Undersink Changes That Make a Huge Difference
This post may contain affiliate links: full affiliate disclosure.
Every time you open the cabinet under the bathroom sink, the same thing happens — items tumble out, bottles tip over, and you cannot find what you need.
Does this sound familiar? You are not alone. This space is tight, awkward, and often becomes the dumping ground for everything.
The plumbing gets in the way, and there is no real organization. But with a few smart adjustments, you can turn that chaos into a tidy, practical space that works for you every single day.
Let’s jump into it!
Contents
- 1 Why Under-Sink Cabinets Always Turn into Chaos
- 2 How to Organize Bathroom Under Sink?
- 2.1 Step 1: Clear Everything Out the Smart Way
- 2.2 Step 2: Measure and Understand Your Cabinet Type
- 2.3 Step 3: Create Zones Based on How You Use Things
- 2.4 Step 4: Use the Right Bins, Drawers, and Risers
- 2.5 Step 5: Use Door Space, Rods, and Wall Surfaces
- 2.6 Step 6: Make It Pretty with a Matching Aesthetic
- 2.7 Step 7: Protect Against Moisture and Mess
- 2.8 Step 8: Do a 5-Minute Monthly Reset
- 3 Conclusion
Why Under-Sink Cabinets Always Turn into Chaos
This space was not made for easy storage. The pipes get in the way, the cabinet is deep but too low, and there is no built-in system to help.
So what do most people do? They throw everything inside – cleaners, extra shampoo bottles, toilet paper, hair tools – and hope it works.
Save this article for later! 👇👇

Over time, it turns into a cluttered mess. You cannot see what you have. Things fall behind or get lost. Without zones, labels, or structure, the mess just keeps growing.
That is why this area gets out of control so fast – and why most setups do not last.
How to Organize Bathroom Under Sink?
To organize your bathroom under sink, you should first clear everything out, measure and understand the cabinets, create zones based on how you will use the space, and use the right bins, drawers, and risers.
Here’s the steps you can follow to organize your bathroom under sink:
Step 1: Clear Everything Out the Smart Way
Before you bring in bins or buy organizers, start by taking everything out from under the sink. Spread it all out so you can see exactly what you have.
You will probably find empty bottles, old razors, or products that have expired. Go through each item and sort it into three clear groups:
- Keep – items you use regularly
- Toss – anything expired, broken, or unused
- Relocate – bulk refills or things that belong elsewhere
Be honest with yourself during this step. If you have not used something in months and forgot it was there, it likely does not need to stay. This is where you make space for true organization.
Related: The Genius Home Organization Hacks
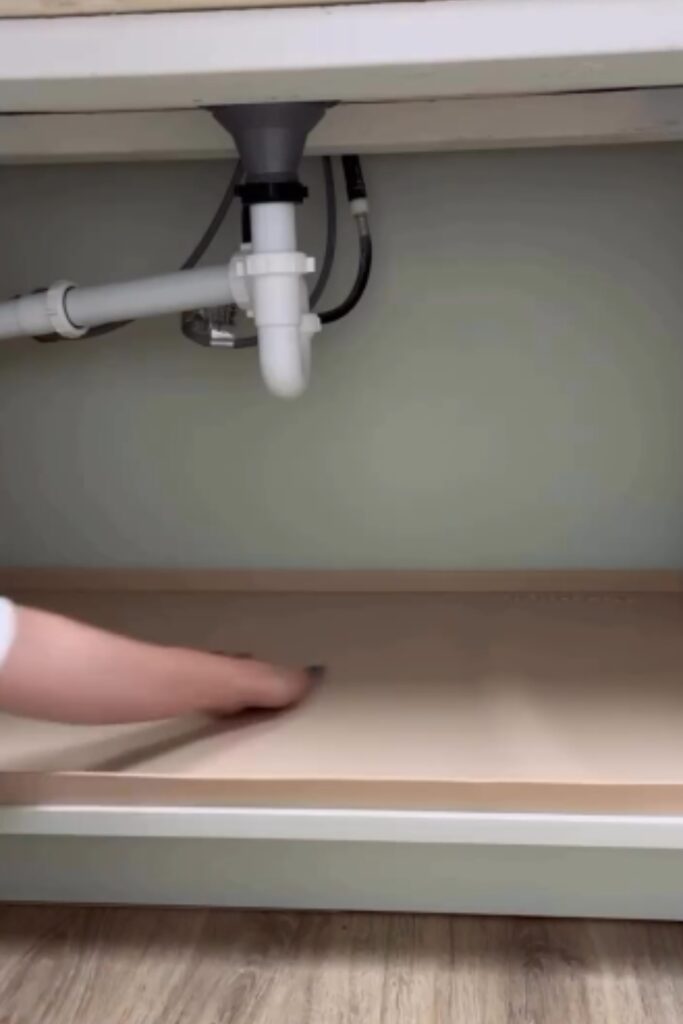
Step 2: Measure and Understand Your Cabinet Type
Before buying bins or drawers, grab a measuring tape. Every under-sink cabinet is different.
Some have large pipes in the center, some have low-clearance spaces, and others are very deep.
You have to start with the measurements of width, depth, and height of the usable area.
Pay attention to the plumbing layout, as it will determine where bins or drawers can be placed.
Also, think about your cabinet type:
- Single-sink cabinets are usually tight with a center pipe.
- Double-sink vanities have split storage and more options.
- Wall-mounted or pedestal sinks offer little to no closed storage.
- Tall or deep cabinets require stacking bins or risers.
When you understand your space and layout, you will avoid choosing the wrong organizers and can make better plans.
Step 3: Create Zones Based on How You Use Things
Now that you have cleared the clutter and measured the space, it is time to create zones.
Instead of throwing everything back in randomly, group items based on how often you use them.
Place your daily essentials, like face wash, razors, or hair products, in easy-to-reach spots at the front. Store backups or refills toward the back or in labeled bins.
Keep cleaning supplies together on one side or in a caddy that you can easily pull out.
When everything has its own zone, it stays organized longer and makes your daily routine much easier.
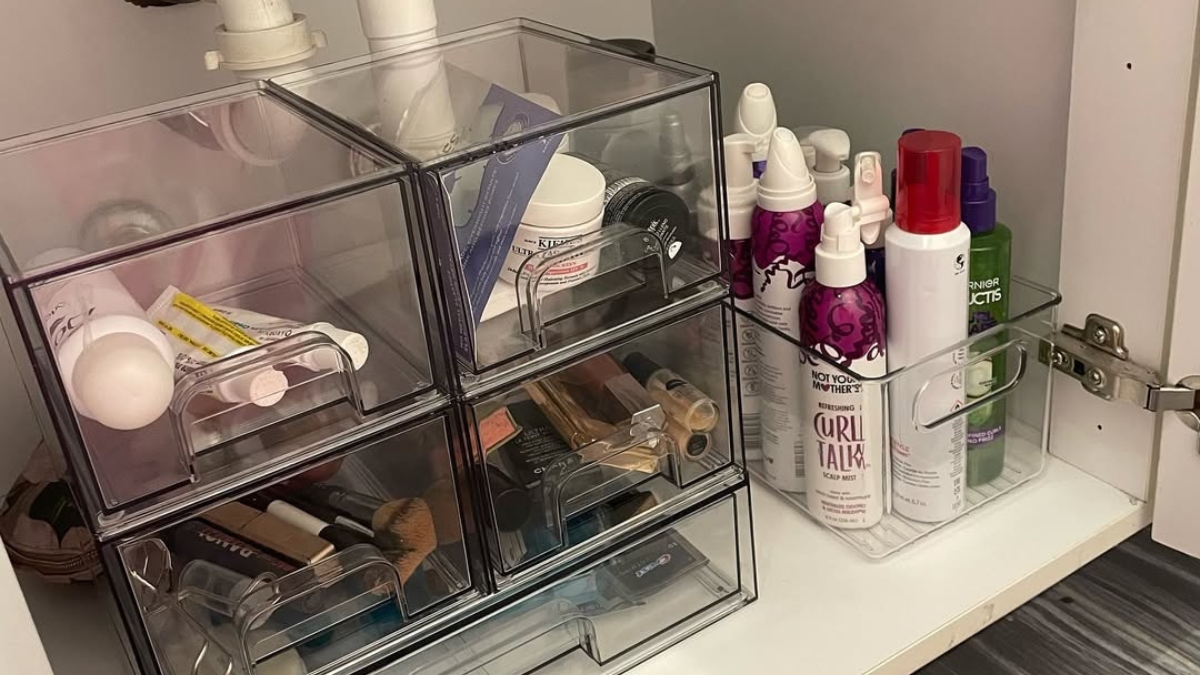
Step 4: Use the Right Bins, Drawers, and Risers
Once you have cleared your zones, pick the right organizers to keep everything tidy and easy to reach.
Do not just grab random bins – your setup should fit your cabinet space and budget.
Think about how visible the items will be, whether the organizers can stack, and how easily you can slide things in and out.
1. Affordable Options
You can use plastic bins from Dollar Tree and other local stores.
Find low-profile baskets, small crates, and containers you can repurpose. Then use zip ties or shelf liners to hold everything in place.
2. Mid-Range Options
Try IKEA bins, stackable drawers, and metal risers. You have to look for products labeled “under sink” to ensure they fit around plumbing.
Brands like Brightroom or mDesign offer good mid-range options.
3. Premium Options
For a tidy look, choose clear pull-out drawers, acrylic stackers, or custom under-sink organizers available at The Container Store or Amazon.
Many of these are designed with U-shaped styles that fit perfectly around pipes.
If you want your setup to stay organized and easy to use, then you have to choose a mix that suits your space and keeps everything within reach.
If you have extra vertical space, then consider using risers and two-tier drawers to make the most of it.
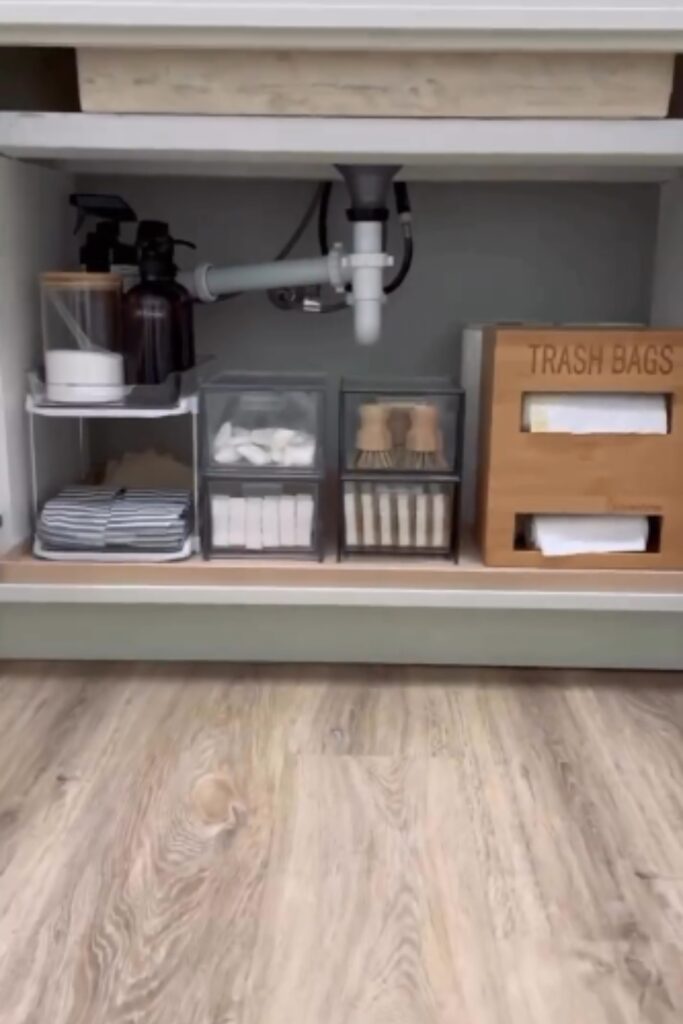
Step 5: Use Door Space, Rods, and Wall Surfaces
- Stick-on bins or adhesive caddies on the inside of cabinet doors are great for holding small items like cotton pads, floss, or makeup wipes.
- Now add tension rod under the sink to hang spray bottles. This keeps the bottom space clear for storage bins.
- Use Command hooks to hang hair tools, cleaning gloves, or brushes vertically to save space.
- Attach a magnetic strip to the cabinet wall to securely hold tweezers, nail clippers, or scissors.
- Hang a small pouch or caddy to store flat items or backup products neatly out of the way.
- These easy additions help you make the most of vertical and hidden space, especially in small or crowded cabinets.
Step 6: Make It Pretty with a Matching Aesthetic
- Choose one color for your bins, like white, clear, and beige. Matching containers will make the space look tidy and uncluttered. You have to avoid using random shapes or colors that do not go well together.
- Label every bin. Use printed labels, sticker tags, or a label maker so you always know where everything belongs. This helps keep things organized and makes it easier to restock.
- You should keep only the items you use daily out in open and store extra in closed bins. The simpler the setup looks, the easier it will be to keep it clean.
Step 7: Protect Against Moisture and Mess
- Use a waterproof liner to protect surfaces.
- Choose plastic bins with lids to keep items safe from moisture.
- Add a moisture absorber to prevent dampness.
- Make sure nothing touches the floor to avoid water damage.
- Clean up spills quickly to keep the area dry and organized.
Step 8: Do a 5-Minute Monthly Reset
Even the best setup can become messy if you do not check it regularly. Once a month, take five minutes to go through your cabinet.
Throw away anything that is empty, expired, or no longer useful. Wipe down the bins and the shelf liner if they are dusty or sticky.
Make sure everything is still in its proper place. If a zone is not working anymore, change it.
You might need to relabel a bin or move the items you use daily to the front again. This quick monthly reset keeps your system running smoothly and stops clutter from piling up.
Related: 5 Bathroom Vanity Organization Tips
Conclusion
Organiztion specially under your bathroom sink might seem like a small task, but it makes a big difference.
When you can quickly grab what you need without searching or knocking things over, your routine flows more smoothly.
No more frustration, no more unused products, and no more mess. This one area sets the tone for your entire bathroom.
When it is tidy and easy to use, everything else feels easier to handle. It is a simple fix, but it is one you will notice every single day.

Fasial is the founder of the Fizzy Flare. He has been a passionate blogger since 2021. He ran three different websites in the past few years. Now he is focusing on Fizzy Flare to build an audience and help them organize their life.