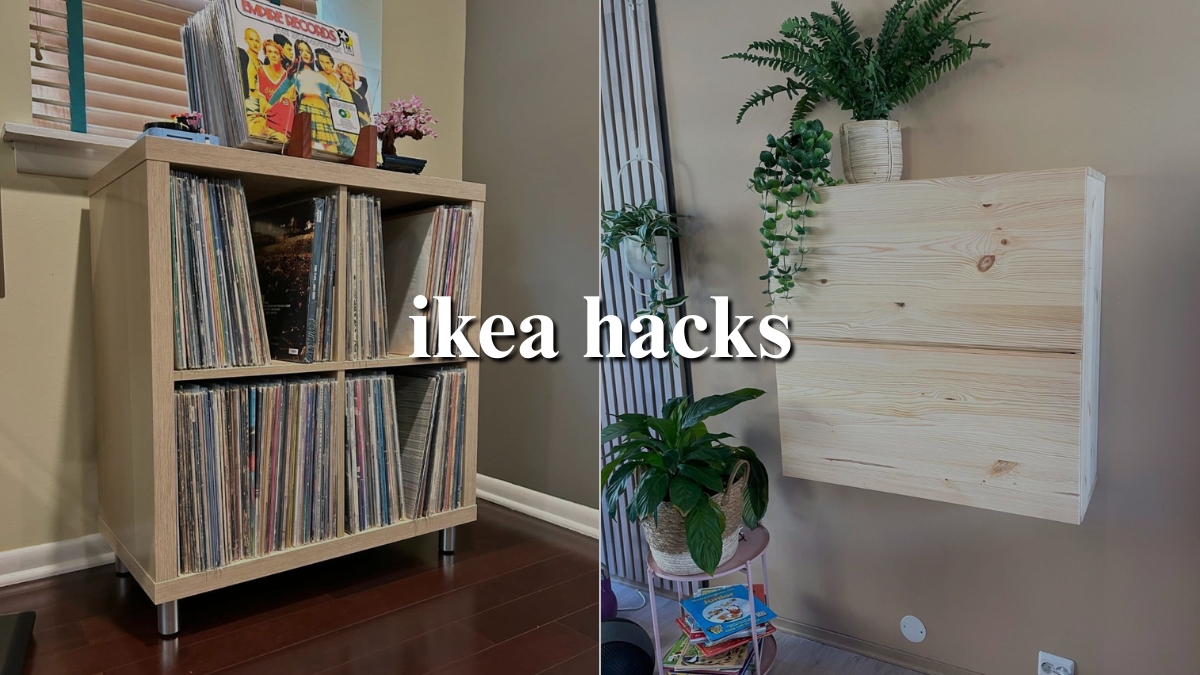
Why Everyone Is Hacking IKEA Furniture in 2025 – Here’s How You Can Try
This post may contain affiliate links: full affiliate disclosure.
IKEA furniture is affordable, easy to find, and fits into almost any home – but let’s face it, it all looks pretty similar.
You have probably seen the same KALLAX shelf or LACK table in a bunch of other homes.
It works, but it does not feel unique. Maybe you need more storage. Maybe your space feels too plain.
Or maybe you just want to create something that feels like yours – without spending a lot of money or using complicated tools. This guide will help you do just that.
It is packed with simple IKEA hacks for beginners, tools you actually need, common mistakes to avoid, and smart tips that most guides leave out.
Let’s jump into it!
Contents
Why IKEA Hacks Are So Popular Right Now
People hack IKEA furniture because it solves many problems at once. It is affordable, which is important if you are on a tight budget.
It is simple, so you can put it together quickly without needing special tools. Most pieces have clean, basic shapes, making them easy to customize.
You can paint them, flip them, add legs, or turn them into something completely new.
Another big reason is space. Many people live in smaller homes, apartments, or shared spaces.
IKEA hacks help you add smart storage, create furniture that can serves more than one purpose, or make a basic piece fit perfectly into a tight corner.
Common Problems People Face with IKEA Furniture
- IKEA furniture often looks plain or ordinary once it is in your home.
- Many pieces are designed for just one purpose and do not offer extra storage or flexibility.
- The design does not always match your personal style or make your space feel special.
- It can be challenging to make IKEA furniture fit in small or awkward spaces.
- Custom furniture costs a lot, but IKEA hacks give you an affordable way to upgrade.
Tools and Materials You’ll Need
You do not need a full tool kit or expensive machines to start hacking IKEA furniture. The goal is to keep it simple and affordable.
Here is a quick list of what you will actually use:
- Screwdriver or drill – Use it to remove parts, add handles, or attach legs.
- Sandpaper or sanding sponge – Roughen the surface so the paint sticks better.
- Paint and primer – Choose a bonding primer for shiny surfaces like LACK or BILLY.
- Paintbrush or foam roller – Apply smooth, even coats without streaks.
- Wood glue or strong adhesive – Perfect for attaching trim or panels.
- Measuring tape – Ensure accurate cuts and proper placement.
- Small nails or screws – Use them to attach new pieces or add reinforcements.
- Optional: Contact paper or peel-and-stick wallpaper – Quickly upgrade surfaces with these.
- Optional: New knobs, handles, or furniture legs – Small changes like these can transform the look.
Start with these essentials, and you will be ready to tackle most beginner IKEA hacks without any hassle.
Related: DIY Recessed Shelves Between Studs
Most Hackable IKEA Pieces (And Why)
| IKEA Piece | Why It Works for DIY Hacks |
| KALLAX | Strong cube shape, perfect for storage benches, shelves, or media units. Easy to add legs or cushions to make it your own. |
| IVAR | Made from real pine wood, so you can sand, stain, cut, or drill it without any trouble. Great for cabinets, mudrooms, or even pet furniture. |
| BILLY | Ideal for built-ins or wall units. It is lightweight and easy to trim or combine. You can add doors, paint, or even lighting to customize it. |
| LACK | Lightweight and affordable. Perfect for quick paint jobs or covering with contact paper. Use it as a table, shelf, or base for your projects. |
| RÅSKOG Cart | Comes with wheels already attached. Great for small spaces like kitchens, bathrooms, or craft corners. |
| HEMNES | Built with a solid wood frame, making it durable. You can easily swap knobs, repaint it, or turn it into stylish storage. |
| BEKVÄM Spice Rack | A $5 gem – use it for books, bathroom storage, or even as wall planters. Sand and paint it to match any room in your home. |
How to Transform an IKEA LACK Table Into a Stylish Marble-Look Accent Table
A plain IKEA LACK side table might be affordable, but it can look basic and uninspiring.
Save this article for later! 👇👇
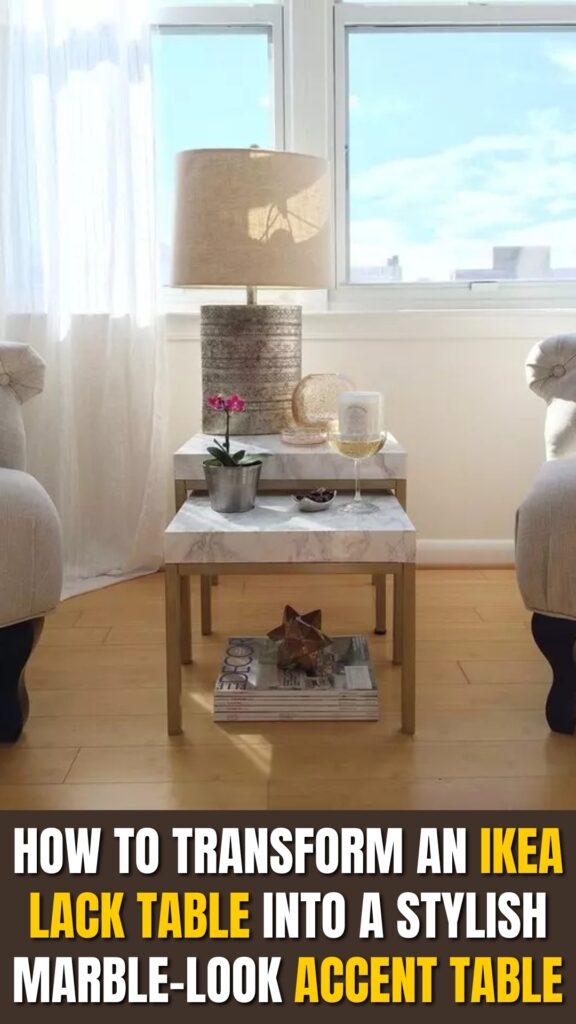
With a few simple steps, you can turn this budget-friendly piece into a chic marble-look accent table that feels custom and stylish.
The best part? You do not need saws or any advanced tools to pull this off.
What You Will Need
- 1 IKEA LACK side table
- Marble-look contact paper
- Matte black spray paint (or any color you prefer)
- A utility knife or scissors
- A smoothing tool or an old credit card
- Optional: Furniture legs or a decorative knob for extra flair
Related: Rolling Under Bed Storage DIY
Step-by-Step Guide
Step 1: Paint the Legs
Start by removing the tabletop from the legs. Lay the legs flat on a surface where you can spray paint them without making a mess.
Pick a matte black spray paint or a color that works well with your space. Spray an even coat on all sides of the legs and allow them to dry completely.
Just painting the legs gives the table a more polished and high-end touch.
Step 2: Cover the Top
Roll out the marble-look contact paper and peel off the backing. Carefully place the sticky side onto the tabletop, smoothing it as you go.
Use your hand or a tool like an old credit card to press out any air bubbles, starting from the center and moving outward.
Once the top is smooth, fold the edges of the paper under the table for a clean finish. Trim any excess paper with a utility knife or scissors.
Step 3: Reattach the Legs
After the paint on the legs has dried, screw them back onto the tabletop.
At this point, your table already looks sleek and updated, thanks to the black legs and marble-effect top.
Step 4 (Optional): Add Extra Details
If you want to take the design even further, consider adding small brass feet to the legs for a modern charm.
You can also attach a decorative knob to the center of one side of the table to create the illusion of a drawer.
Another option is to add wood trim around the edge of the tabletop for added texture and detail.
Time, Skill, and Cost Estimates
- Time: Around 45 minutes
- Skill Level: Beginner-friendly
- Total Cost: Under $25
By following these simple steps, you can transform a plain table into something that looks far more expensive.
Avoid These Common Mistakes
- Do not paint without priming. IKEA surfaces are smooth, and paint will peel off quickly if you skip a good shellac-based primer.
- Do not use hot glue on particle board. It will not hold up. Use wood glue or construction adhesive instead.
- Do not skip sanding. A quick scuff with fine sandpaper helps the paint stick better and last longer.
- Do not overload shelves. Many IKEA pieces have hollow sections and can sag or break under too much weight.
- Do not drill without measuring. One wrong hole can split the board or end up in the wrong spot.
- Do not rush drying time. Paint and glue need time to fully cure. If you rush, your project will not last.
Related: How to DIY Pegboard Tool Organizer
Conclusion
You do not need to be an expert or have a workshop to start your first IKEA hack.
Begin with something simple – a table makeover, a shelf upgrade, or just changing the knobs.
Once you give it a try, you will realize how easy and fun it can be.Do not worry about making it perfect. DIY is about trying ideas, fixing mistakes, and learning as you go.
The goal is not to impress others – it is to make your space reflect more of you.Take your time, follow the steps, and enjoy the process.
The more you experiment, the better you will get. Soon, your home will have pieces you did not just buy – you made them better.

Fasial is the founder of the Fizzy Flare. He has been a passionate blogger since 2021. He ran three different websites in the past few years. Now he is focusing on Fizzy Flare to build an audience and help them organize their life.